three.jsを散策する⑦ テクスチャで装いを
three.jsを学んでいくシリーズの7回目です。描画されるオブジェクトの面に画像を貼り付けて装飾する方法を確認します。
three.jsの公式サイトのマニュアルを参考にテクスチャの基本的な使い方を確認します。描画されるオブジェクトの面に画像を貼り付けて装飾します。公式サイトを確認したい方は下記のリンクからどうぞ。
ルートフォルダにindex.htmlとmain.jsを作成します。今回は画像を使用するので、ルートフォルダ内にimgフォルダを作成し画像をいれます。
threejsProject
  ├ index.html
  ├ main.js
  └ img
     ├ img01.png
     ├ img02.png
     ├ img03.png
     ├ img04.png
     ├ img05.png
     └ img06.png
今回もカメラの角度を変えられるようにOrbitControls(オービットコントロール)も実装しておきます。
index.htmlを下記のように作成します。
<!DOCTYPE html>
<html>
  <head>
    <meta charset="UTF-8">
    <meta http-equiv="X-UA-Compatible" content="ie=edge">
    <meta name="viewport" content="width=device-width, initial-scale=1.0">
    <title>three.js app</title>
    <script async src="https://unpkg.com/es-module-shims@1.8.0/dist/es-module-shims.js"></script>
    <script type="importmap">
     {
       "imports": {
	 "three": "https://unpkg.com/three@v0.156.1/build/three.module.js",
	 "three/addons/": "https://unpkg.com/three@v0.156.1/examples/jsm/"
       }
     }
    </script>
  </head>
  <body>

    <div id="canvas-container"></div>

    <script type="module" src="main.js"></script>
  </body>
</html>
テクスチャ画像1枚で装飾する
まずテクスチャ画像を1枚使用してBoxGeometry(ボックスジオメトリ)を装飾する方法を確認します。 画像を使用するにはTextureLoader(テクスチャローダー)を作成し、loadメソッドを呼び出して画像のURLを指定します。それからマテリアルのmapプロパティをtextureにすれば良いようです。
main.jsを下記のように作成します。
import * as THREE from 'three';
import { OrbitControls } from 'three/addons/controls/OrbitControls.js';

const container = document.querySelector( '#canvas-container' );
let width = container.clientWidth;
let height = 350;

//レンダラー
const renderer = new THREE.WebGLRenderer({ antialias: true });
renderer.setSize( width, height );
container.appendChild( renderer.domElement );

//シーン
const scene = new THREE.Scene();
scene.background = new THREE.Color( 0xffffff );

//カメラ
const camera = new THREE.PerspectiveCamera( 60, width / height, 0.1, 100 );
const controls = new OrbitControls( camera, renderer.domElement );
camera.position.set( 0, 0, 2 );
controls.update();

//リサイズの処理
function resize() {
    renderer.setSize( container.clientWidth, height );
    camera.aspect = container.clientWidth / height;
    camera.updateProjectionMatrix();
};
window.addEventListener( "resize", resize );

//ジオメトリ
const geometry = new THREE.BoxGeometry( 1, 1, 1 );
const loader = new THREE.TextureLoader();
const texture = loader.load( 'img/img01.png' );
texture.colorSpace = THREE.SRGBColorSpace;
const material = new THREE.MeshBasicMaterial({ map: texture });
const cube = new THREE.Mesh( geometry, material );
scene.add( cube );

//アニメーション
function animate() {
    requestAnimationFrame( animate );

    cube.rotation.x += 0.005;
    cube.rotation.y += 0.003;

    controls.update();

    renderer.render( scene, camera );
}

animate();
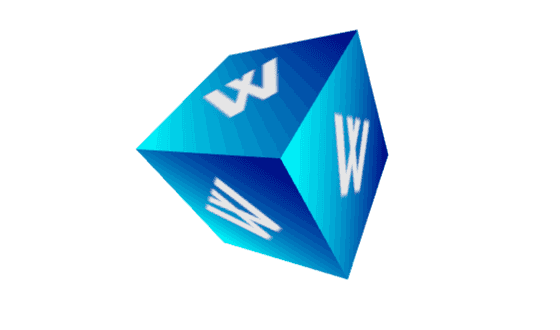
1枚の画像がBoxGeometry(ボックスジオメトリ)の各面に貼られているのが確認できました。SphereGeometry(スフィアジオメトリ)でも試してみます。main.jsのジオメトリとアニメーションの部分を下記のように変更してます。
//ジオメトリ
const geometry = new THREE.SphereGeometry( 0.7, 48, 48 );
const loader = new THREE.TextureLoader();
const texture = loader.load( 'img/img01.png' );
const material = new THREE.MeshBasicMaterial({ map: texture });
const sphere = new THREE.Mesh( geometry, material );
scene.add( sphere );
//アニメーション
function animate() {
    requestAnimationFrame( animate );

    sphere.rotation.x += 0.005;
    sphere.rotation.y += 0.003;

    controls.update();

    renderer.render( scene, camera );
}

animate();
描画を確認してみます。
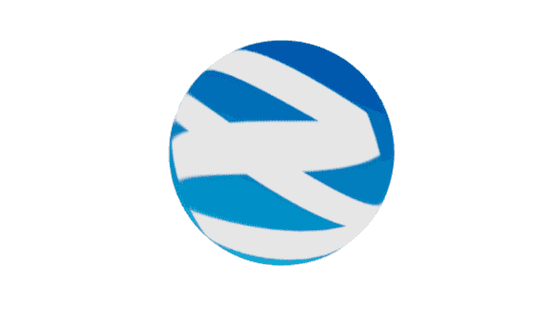
面が1つなのでこんな感じになりました。
テクスチャ画像複数枚で装飾する
BoxGeometry(ボックスジオメトリ)の各面に違う画像を貼り付ける方法を確認してみます。各画像のURLからテクスチャ画像を返すloadColorTextureを定義してマテリアルに配列で格納するようにします。main.jsを下記のように作成します。
import * as THREE from 'three';
import { OrbitControls } from 'three/addons/controls/OrbitControls.js';

const container = document.querySelector( '#canvas-container' );
let width = container.clientWidth;
let height = 350;

//レンダラー
const renderer = new THREE.WebGLRenderer({ antialias: true });
renderer.setSize( width, height );
container.appendChild( renderer.domElement );

//シーン
const scene = new THREE.Scene();
scene.background = new THREE.Color( 0xffffff );

//カメラ
const camera = new THREE.PerspectiveCamera( 60, width / height, 0.1, 100 );
const controls = new OrbitControls( camera, renderer.domElement );
camera.position.set( 0, 0, 2 );
controls.update();

//リサイズの処理
function resize() {
    renderer.setSize( container.clientWidth, height );
    camera.aspect = container.clientWidth / height;
    camera.updateProjectionMatrix();
};
window.addEventListener( "resize", resize );

//ジオメトリ
const geometry = new THREE.BoxGeometry( 1, 1, 1 );
const loader = new THREE.TextureLoader();

function loadColorTexture( path ) {
  const texture = loader.load( path );
  texture.colorSpace = THREE.SRGBColorSpace;
  return texture;
}

const materials = [
  new THREE.MeshBasicMaterial({map: loadColorTexture('/img/img01.png')}),
  new THREE.MeshBasicMaterial({map: loadColorTexture('/img/img02.png')}),
  new THREE.MeshBasicMaterial({map: loadColorTexture('/img/img03.png')}),
  new THREE.MeshBasicMaterial({map: loadColorTexture('/img/img04.png')}),
  new THREE.MeshBasicMaterial({map: loadColorTexture('/img/img05.png')}),
  new THREE.MeshBasicMaterial({map: loadColorTexture('/img/img06.png')}),
];
const cube = new THREE.Mesh( geometry, materials );
scene.add( cube );

//アニメーション
function animate() {
    requestAnimationFrame( animate );

    cube.rotation.x += 0.005;
    cube.rotation.y += 0.003;

    controls.update();

    renderer.render( scene, camera );
}

animate();
描画を確認してみます。
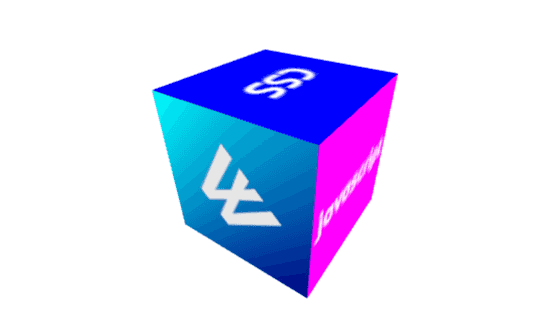
BoxGeometry(ボックスジオメトリ)の各面にそれぞれの画像を貼り付けることができました。ジオメトリによって指定できるマテリアルの数が変わり、ConeGeometry(コーンジオメトリ)には2つ、CylinderGeometry(シリンダージオメトリ)には3つ指定できます。試しにCylinderGeometry(シリンダージオメトリ)も描画してみます。main.jsを下記のようにしてみます。
import * as THREE from 'three';
import { OrbitControls } from 'three/addons/controls/OrbitControls.js';

const container = document.querySelector( '#canvas-container' );
let width = container.clientWidth;
let height = 350;

//レンダラー
const renderer = new THREE.WebGLRenderer({ antialias: true });
renderer.setSize( width, height );
container.appendChild( renderer.domElement );

//シーン
const scene = new THREE.Scene();
scene.background = new THREE.Color( 0xffffff );

//カメラ
const camera = new THREE.PerspectiveCamera( 60, width / height, 0.1, 100 );
const controls = new OrbitControls( camera, renderer.domElement );
camera.position.set( 0, 0, 2 );
controls.update();

//リサイズの処理
function resize() {
    renderer.setSize( container.clientWidth, height );
    camera.aspect = container.clientWidth / height;
    camera.updateProjectionMatrix();
};
window.addEventListener( "resize", resize );

//ジオメトリ
const geometry = new THREE.CylinderGeometry( 0.5, 0.5, 1, 60 );
const loader = new THREE.TextureLoader();

function loadColorTexture( path ) {
  const texture = loader.load( path );
  texture.colorSpace = THREE.SRGBColorSpace;
  return texture;
}

const materials = [
  new THREE.MeshBasicMaterial({map: loadColorTexture('/img/img01.png')}),
  new THREE.MeshBasicMaterial({map: loadColorTexture('/img/img02.png')}),
  new THREE.MeshBasicMaterial({map: loadColorTexture('/img/img03.png')}),
];
const cylinder = new THREE.Mesh( geometry, materials );
scene.add( cylinder );

//アニメーション
function animate() {
    requestAnimationFrame( animate );

    cylinder.rotation.x += 0.005;
    cylinder.rotation.y += 0.003;
    cylinder.rotation.z += 0.004;

    controls.update();

    renderer.render( scene, camera );
}

animate();
描画を確認してみます。
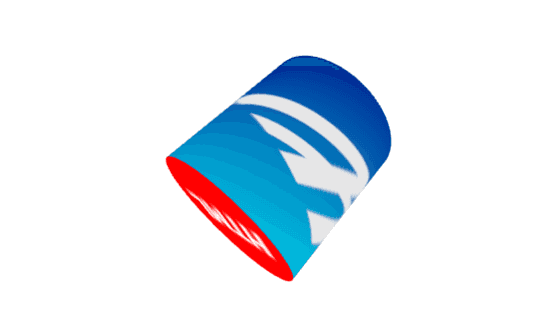
こんな感じになりました。今回はテクスチャの基本的な使い方を確認できました。