three.jsを散策する⑧ ライト燦燦と
three.jsを学んでいくシリーズの8回目です。今回は様々なライトを使用して描画の違いを確認していきます。
three.jsの公式サイトのマニュアルを参考に様々なライトを使用して描画の違いを確認していきます。公式サイトを確認したい方は下記のリンクからどうぞ。
ルートフォルダにベースとなるindex.htmlとmain.jsを作成します。今回もカメラの角度を変えられるようにOrbitControls(オービットコントロール)を実装します。
index.htmlを下記のように作成します。
<!DOCTYPE html>
<html>
  <head>
    <meta charset="UTF-8">
    <meta http-equiv="X-UA-Compatible" content="ie=edge">
    <meta name="viewport" content="width=device-width, initial-scale=1.0">
    <title>three.js app</title>
    <script async src="https://unpkg.com/es-module-shims@1.8.0/dist/es-module-shims.js"></script>
    <script type="importmap">
     {
       "imports": {
	 "three": "https://unpkg.com/three@v0.156.1/build/three.module.js",
	 "three/addons/": "https://unpkg.com/three@v0.156.1/examples/jsm/"
       }
     }
    </script>
  </head>
  <body>

    <div id="canvas-container"></div>

    <script type="module" src="main.js"></script>
  </body>
</html>
今回ジオメトリはSphereGeometry(スフィアジオメトリ)、BoxGeometry(ボックスジオメトリ)と土台となるPlaneGeometry(プレーンジオメトリ)を描画します。main.jsを下記のように作成します。
import * as THREE from 'three';
import { OrbitControls } from 'three/addons/controls/OrbitControls.js';

const container = document.querySelector( '#canvas-container' );
let width = container.clientWidth;
let height = 300;

//レンダラー
const renderer = new THREE.WebGLRenderer({ antialias: true });
renderer.setSize( width, height );
container.appendChild( renderer.domElement );

//シーン
const scene = new THREE.Scene();
scene.background = new THREE.Color( 0x000000 );

//カメラ
const camera = new THREE.PerspectiveCamera( 40, width / height, 0.1, 100 );
camera.position.set( 0, 10, 20 );

//オービットコントロール
const controls = new OrbitControls( camera, renderer.domElement );
controls.target.set(0, 5, 0);
controls.update();

//リサイズの処理
function resize() {
    renderer.setSize( container.clientWidth, height );
    camera.aspect = container.clientWidth / height;
    camera.updateProjectionMatrix();
};
window.addEventListener( "resize", resize );

//プレーンジオメトリ
const planeSize = 40;
const loader = new THREE.TextureLoader();
const planeGeo = new THREE.PlaneGeometry( planeSize, planeSize );
const planeMat = new THREE.MeshLambertMaterial({ color: 0xfffcdb });
const planeMesh = new THREE.Mesh( planeGeo, planeMat );
planeMesh.rotation.x = Math.PI * -.5;
scene.add( planeMesh );

//ボックスジオメトリ
const cubeSize = 3;
const cubeGeo = new THREE.BoxGeometry( cubeSize, cubeSize, cubeSize );
const cubeMat = new THREE.MeshPhongMaterial({ color: 0xdc143c });
const cubeMesh = new THREE.Mesh( cubeGeo, cubeMat );
cubeMesh.position.set( cubeSize / 2 + 1, cubeSize / 2, 0 );
scene.add( cubeMesh );

//スフィアジオメトリ
const sphereRadius = 1.5;
const sphereWidthDivisions = 32;
const sphereHeightDivisions = 16;
const sphereGeo = new THREE.SphereGeometry( sphereRadius, sphereWidthDivisions, sphereHeightDivisions );
const sphereMat = new THREE.MeshPhongMaterial({ color: 0x008080 });
const sphereMesh = new THREE.Mesh( sphereGeo, sphereMat );
sphereMesh.position.set( -sphereRadius - 1, sphereRadius, 0 );
scene.add( sphereMesh );

//ライト
const color = 0xffffff;
const intensity = 3;
const light = new THREE.AmbientLight( color, intensity );
scene.add( light );

//アニメーション
function animate() {
    requestAnimationFrame( animate );
    controls.update();
    renderer.render( scene, camera );
}

animate();
オービットコントロールの部分でカメラの軌道の中心座標を調整しています。
controls.target.set(0, 5, 0);
プレーンジオメトリの下記の部分で平面がxz軸上になるようにしています。
planeMesh.rotation.x = Math.PI * -.5;
あとはライトの部分を変更して描画を確認していきます。
AmbientLight(アンビエントライト)
これまでの例で使用してきたAmbientLight(アンビエントライト)です。このライトはシーン上の各オブジェクトを均一に照らす方向性のないライトです。コンストラクタを確認します。
AmbientLight( color : Integer, intensity : Float )
color(色)とintensity(光の強さ)を指定できます。下記のようにしてみます。
const color = 0xffffff;
const intensity = 3;
const light = new THREE.AmbientLight( color, intensity );
scene.add( light );
描画を確認します。

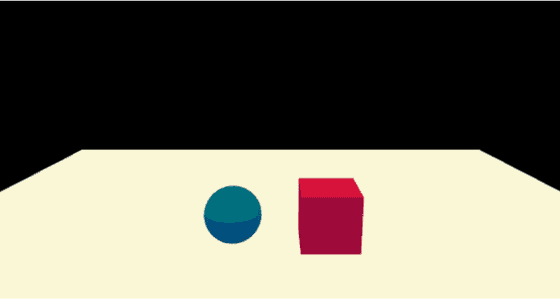
シーン上の各オブジェクトが均一に照らされているので平坦な感じに描画されています。
HemisphereLight(ヘミスフィアライト)
HemisphereLight(ヘミスフィアライト)はシーンの上方から照らすライトです。コンストラクタを確認します。
HemisphereLight( skyColor : Integer, groundColor : Integer, intensity : Float )
skyColor(上方の色)、groundColor(下方の色)、intensity(光の強さ)を指定できます。skyColor(上方の色)からgroundColor(下方の色)へ徐々に変色していきます。下記のようにしてみます。
const skyColor = 0xffffff;
const groundColor = 0x0000ff;//ブルー
const intensity = 3;
const light = new THREE.HemisphereLight( skyColor, groundColor, intensity );
scene.add( light );
描画を確認します。
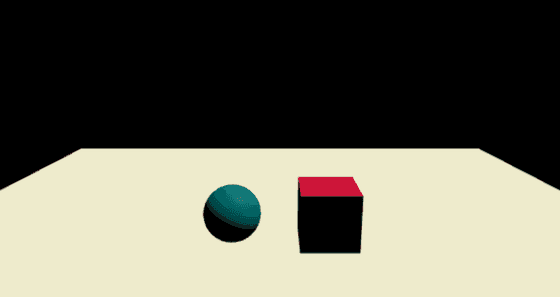
groundColor(下方の色)に 0x0000ffを指定したので描画されたオブジェクトの下方が青みがかっているのが確認できます。
DirectionalLight(ディレクショナルライト)
DirectionalLight(ディレクショナルライト)はターゲットに対して特定の方向から照らすライトです。コンストラクタを確認します。
DirectionalLight( color : Integer, intensity : Float )
color(色)とintensity(光の強さ)を指定できます。下記のようにしてみます。target.positionプロパティでターゲットの座標を指定できます。デフォルトの座標は(0, 0, 0)です。
const color = 0xffffff;
const intensity = 3;
const light = new THREE.DirectionalLight(color, intensity);
light.position.set( 0, 10, 0 );
light.target.position.set( -5, 0, 0 );
scene.add( light );
scene.add(light.target);
描画を確認します。
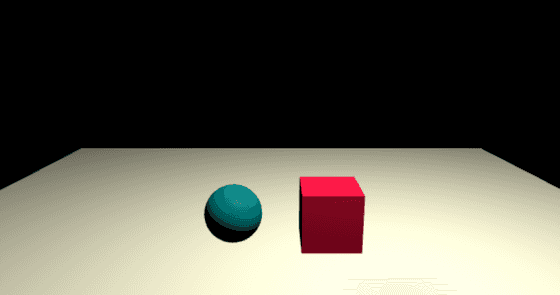
カメラの角度を変えてもターゲットに対して常に同じ方向からライトアップされます。

ターゲットに対して特定の方向から照らすライトということです。
PointLight(ポイントライト)
PointLight(ポイントライト)は座標上ひとつのポイントから光を放つライトです。コンストラクタを確認します。
PointLight( color : Integer, intensity : Float, distance : Number, decay : Float )
color(色)、intensity(光の強さ)、distance(光の届く距離)、decay(距離による減衰値)を指定できます。distance(光の届く距離)はデフォルトの0で無限の距離になります。下記のようにしてみます。
const color = 0xffffff;
const intensity = 1500;
const distance = 0;
const decay = 2;
const light = new THREE.PointLight( color, intensity, distance, decay );
light.position.set( 5, 20, 5 );
scene.add( light );
描画を確認します。
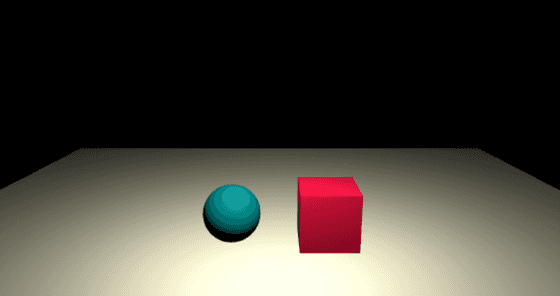
電球で照らされているようなライトアップになりました。
SpotLight(スポットライト)
SpotLight(スポットライト)は座標上のひとつのポイントから円錐状に広がる光を放つライトです。コンストラクタを確認します。
SpotLight( color : Integer, intensity : Float, distance : Float, angle : Radians, penumbra : Float, decay : Float )
color(色)、intensity(光の強さ)、distance(光の届く距離)angle(光の分散角度)、penumbra(光の中心部から外側への減衰値)、decay(距離による減衰値)を指定できます。下記のようにしてみます。
const color = 0xffffff;
const intensity = 400;
const distance = 0;
const angle = Math.PI/2;
const penumbra = 0.8;
const decay = 2;
const light = new THREE.SpotLight( color, intensity, distance, angle, penumbra, decay );
light.position.set( 0, 10, 5 );
scene.add( light );
描画を確認します。
舞台のようなライトアップになりましたね。
RectAreaLight(レクトエリアライト)
RectAreaLight(レクトエリアライト)は光源が長方形のライトです。窓からの光や室内の蛍光灯の光などを表現するのに使用するようです。コンストラクタを確認します。
RectAreaLight( color : Integer, intensity : Float, width : Float, height : Float )
color(色)、intensity(光の強さ)、width(光源の幅)、height(光源の高さ)を指定できます。MeshStandardMaterial(スタンダードマテリアル)とMeshPhysicalMaterial(フィジカルマテリアル)のみサポートされているとのこと。今回はMeshStandardMaterial(スタンダードマテリアル)を使用します。main.jsのジオメトリの部分を下記のように変更します。
//プレーンジオメトリ
const planeSize = 40;
const loader = new THREE.TextureLoader();
const planeGeo = new THREE.PlaneGeometry( planeSize, planeSize );
const planeMat = new THREE.MeshStandardMaterial({ color: 0xfffcdb });
const planeMesh = new THREE.Mesh( planeGeo, planeMat );
planeMesh.rotation.x = Math.PI * -.5;
scene.add( planeMesh );

//ボックスジオメトリ
const cubeSize = 3;
const cubeGeo = new THREE.BoxGeometry( cubeSize, cubeSize, cubeSize );
const cubeMat = new THREE.MeshStandardMaterial({ color: 0xdc143c });
const cubeMesh = new THREE.Mesh( cubeGeo, cubeMat );
cubeMesh.position.set( cubeSize / 2 + 1, cubeSize / 2, 0 );
scene.add( cubeMesh );

//スフィアジオメトリ
const sphereRadius = 1.5;
const sphereWidthDivisions = 32;
const sphereHeightDivisions = 16;
const sphereGeo = new THREE.SphereGeometry( sphereRadius, sphereWidthDivisions, sphereHeightDivisions );
const sphereMat = new THREE.MeshStandardMaterial({ color: 0x008080 });
const sphereMesh = new THREE.Mesh( sphereGeo, sphereMat );
sphereMesh.position.set( -sphereRadius - 1, sphereRadius, 0 );
scene.add( sphereMesh );
また、RectAreaLight(レクトエリアライト)を使用するには追加でアドオンを読み込む必要があるのでimportを追加します。
import * as THREE from 'three';
import { OrbitControls } from 'three/addons/controls/OrbitControls.js';
import { RectAreaLightUniformsLib } from 'three/addons/lights/RectAreaLightUniformsLib.js';//追加
import { RectAreaLightHelper } from 'three/addons/helpers/RectAreaLightHelper.js';//追加
そして、レンダラーの部分でRectAreaLightUniformsLib.initを呼び出します。
//レンダラー
const renderer = new THREE.WebGLRenderer({ antialias: true });
RectAreaLightUniformsLib.init();
renderer.setSize( width, height );
container.appendChild( renderer.domElement );
これで準備ができたのでライトの部分を下記のようにしてみます。
//ライト
const color = 0xffffff;
const intensity = 10;
const rectWidth = 12;
const rectHeight = 4;
const light = new THREE.RectAreaLight( color, intensity, rectWidth, rectHeight );
light.position.set(0, 10, 3);
light.rotation.x = THREE.MathUtils.degToRad( -90 );
scene.add(light);

const helper = new RectAreaLightHelper( light );
light.add( helper );
描画を確認します。
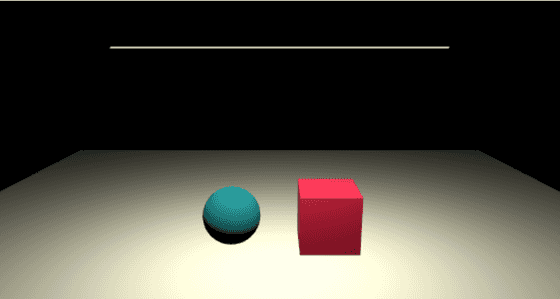
カメラの角度を変えると長方形の光源が確認できます。

今回は様々なライトによる描画の違いを確認できました。