CodeIgniter 4 Emailライブラリを使用してフォームからメールを送信するチュートリアル
CodeIgniter4のEmailライブラリの使い方を確認します。GmailのSMTPを使用してローカル環境のフォームからメールを送信します。
CodeIgniter4のプロジェクトの作成
CodeIgniterのEmailライブラリを使用してメールを送信する方法を確認します。GmailのSMTPを使用します。開発環境にXAMPPを使用しますがXAMPP側でメールサーバーの設定を行う必要はありません。今回の開発環境は下記のようになります。
- Windows 10
- CodeIgniter v4.2.1
- XAMPP v8.1.6
- Composer v 2.3.10
ComposerはCodeIgniterをインストールするときのみ使用します。テキストエディター、ターミナルはお好みでどうぞ。またビューの作成ではSpectre.cssを使用します。
それではプロジェクトを作成します。XAMPPのhtdocsに移動しターミナルで下記コマンドを実行します。プロジェクト名はci4-email-tutorialとします。
CodeIgniter4のプロジェクトの作成
composer create-project codeigniter4/appstarter ci4-email-tutorial
開発モードに設定していきます。テキストエディターでenvファイルを.envにリネームしCI_ENVIRONMENTをdevelopmentに、app.baseURLをhttp://localhost/ci4-email-tutorial/publicに設定します。
.env 抜粋
#--------------------------------------------------------------------
# ENVIRONMENT
#--------------------------------------------------------------------

 CI_ENVIRONMENT = development

#--------------------------------------------------------------------
# APP
#--------------------------------------------------------------------

 app.baseURL = 'http://localhost/ci4-email-tutorial/public/'
これで開発モードに設定できました。
Emailの環境設定
CodeIgniterのEmailライブラリを使用するためにEmailの情報を設定していきます。\app\Config内にEmail.phpがあるので$SMTPHost、$SMTPUser、$SMTPPass、$SMTPPort、$SMTPCryptoを設定し下記のようにします。
app\Config\Email.php
<?php

namespace Config;

use CodeIgniterConfigBaseConfig;

class Email extends BaseConfig
{
  /**
   * @var string
   */
  public $fromEmail;

  /**
   * @var string
   */
  public $fromName;

  /**
   * @var string
   */
  public $recipients;

  /**
   * The "user agent"
   *
   * @var string
   */
  public $userAgent = 'CodeIgniter';

  /**
   * The mail sending protocol: mail, sendmail, smtp
   *
   * @var string
   */
  public $protocol = 'mail';

  /**
   * The server path to Sendmail.
   *
   * @var string
   */
  public $mailPath = '/usr/sbin/sendmail';

  /**
   * SMTP Server Address
   *
   * @var string
   */
  public $SMTPHost = 'smtp.googlemail.com';

  /**
   * SMTP Username
   *
   * @var string
   */
  public $SMTPUser = 'yourgmail';//メール送信に使用するGmail

  /**
   * SMTP Password
   *
   * @var string
   */
  public $SMTPPass = 'xxxxxxxxxxxxxxxx';//Googleアカウントで取得する16文字のアプリのパスワード

  /**
   * SMTP Port
   *
   * @var int
   */
  public $SMTPPort = 465;

  /**
   * SMTP Timeout (in seconds)
   *
   * @var int
   */
  public $SMTPTimeout = 5;

  /**
   * Enable persistent SMTP connections
   *
   * @var bool
   */
  public $SMTPKeepAlive = false;

  /**
   * SMTP Encryption. Either tls or ssl
   *
   * @var string
   */
  public $SMTPCrypto = 'tls';

  /**
   * Enable word-wrap
   *
   * @var bool
   */
  public $wordWrap = true;

  /**
   * Character count to wrap at
   *
   * @var int
   */
  public $wrapChars = 76;

  /**
   * Type of mail, either 'text' or 'html'
   *
   * @var string
   */
  public $mailType = 'text';

  /**
   * Character set (utf-8, iso-8859-1, etc.)
   *
   * @var string
   */
  public $charset = 'UTF-8';

  /**
   * Whether to validate the email address
   *
   * @var bool
   */
  public $validate = false;

  /**
   * Email Priority. 1 = highest. 5 = lowest. 3 = normal
   *
   * @var int
   */
  public $priority = 3;

  /**
   * Newline character. (Use “rn” to comply with RFC 822)
   *
   * @var string
   */
  public $CRLF = "rn";

  /**
   * Newline character. (Use “rn” to comply with RFC 822)
   *
   * @var string
   */
  public $newline = "rn";

  /**
   * Enable BCC Batch Mode.
   *
   * @var bool
   */
  public $BCCBatchMode = false;

  /**
   * Number of emails in each BCC batch
   *
   * @var int
   */
  public $BCCBatchSize = 200;

  /**
   * Enable notify message from server
   *
   * @var bool
   */
  public $DSN = false;
}
$SMTPPassに設定するパスワードはGoogleアカウントにログインして取得します。詳しい取得方法についてはXAMPP PHP開発環境セットアップメモを参照してみてください。これでEmailの環境設定は完了です。
EmailControllerの作成
コントローラを作成します。ターミナルで下記コマンドで実行します。
EmailController.phpの作成
php spark make:controller Email --suffix
EmailController.phpが生成されるので下記のようにします。
app/Controllers/EmailController.php
<?php

namespace App\Controllers;

use App\Controllers\BaseController;

class EmailController extends BaseController
{
    public function __construct()
    {
        helper('form');
    }

    public function index()
    {
        return view('contact_form');
    }

    public function sendMail()
    {
        $rules = [
            'email' => [
                'rules' => 'required|valid_email',
                'errors' => [
                    'required' => 'メールアドレスは必須です。',
                    'valid_email' => '有効なメールアドレスを入力してください。'
                ]
            ],
            'subject' => [
                'rules' => 'required',
                'errors' => [
                    'required' => '件名は必須項目です。'
                ]
            ],
            'message' => [
                'rules' => 'required',
                'errors' => [
                    'required' => 'メッセージは必須項目です。'
                ]
            ]
        ];

        if ($this->validate($rules)) {
            $to = $this->request->getVar('email');
            $subject = $this->request->getVar('subject');
            $message = $this->request->getVar('message');

            $email = ConfigServices::email();

            $email->setTo($to);
            $email->setFrom('admin@example.com');//差出人の任意のメールアドレスをいれます。
            $email->setSubject($subject);
            $email->setMessage($message);

            if ($email->send()) {
                $resultReport = 'メールが送信されました。';
            } else {
                $resultReport = 'メールの送信に失敗しました。';
            }
            return redirect()->to(base_url('email'))->with('message', $resultReport);

        } else {
            return view('contact_form',[
               'validation' => $this->validator
            ]);
        }
    }
}
ルーティングを設定しておきます。今回はコントローラがひとつなのでシンプルです。
app/Config/Routes.php抜粋
$routes->get('email', 'EmailController::index');
$routes->post('email', 'EmailController::sendMail');
contact_formビューの作成
それではビューを作成していきます。app/Views内にcontact_form.phpを作成します。Spectre.cssを使用していますがお好みでどうぞ。
app/Views/contact_form.php
<!doctype html>
<html>
  <head>
    <meta charset="utf-8">
    <meta name="viewport" content="width=device-width, initial-scale=1">
    <link rel="stylesheet" href="https://unpkg.com/spectre.css/dist/spectre.min.css">
    <title>CodeIgniter 4 Email library tutorial</title>
  </head>
  <body>

    <?php $validation =  ConfigServices::validation(); ?>

    <div class="container">
    <div class="columns">
    <div class="column col-9 col-mx-auto">
	  <h3 class="mt-2">CodeIgniter 4 Emailライブラリチュートリアル</h3>

	  <?php if (session()->getFlashdata('message')): ?>
	    <div class="toast">
	      <?= session()->getFlashdata('message') ?>
	    </div>
	  <?php endif; ?>

	  <?= form_open();?>
	  <div class ="form-group">

	    <label class="form-label" for="email">送信先メールアドレス</label>
	    <input class="form-input <?= $validation->getError('email')?'is-error':'' ?>" name="email" type="email" placeholder="email@exaple.com">
	    <?php if ($validation->getError('email')): ?>
	      <p class="text-error mt-0"><?= $validation->getError('email') ?></p>
	    <?php endif; ?>

	    <label class="form-label" for="subject">件名</label>
	    <input class="form-input <?= $validation->getError('subject')?'is-error':'' ?>" name="subject" type="text" placeholder="メッセージ件名">
	    <?php if ($validation->getError('subject')): ?>
	      <p class="text-error mt-0"><?= $validation->getError('subject') ?></p>
	    <?php endif; ?>

	    <label class="form-label" for="message">Message</label>
	    <textarea class="form-input <?= $validation->getError('message')?'is-error':'' ?>" name="message" placeholder="メッセージ本文" rows="8"></textarea>
	    <?php if ($validation->getError('message')): ?>
	      <p class="text-error mt-0"><?= $validation->getError('message') ?></p>
	    <?php endif; ?>
	    <br>

	    <input class="btn btn-primary btn-lg" type="submit" value="送信">

	  </div>
	  <?= form_close();?>
    </div>
    </div>
    </div>
  </body>
</html>
session()->getFlashdata('message')でメール送信後のメッセージを表示します。メッセージの表示にSpectre.cssのトーストコンポーネントを使用しています。
またヴァリデーションエラーがあった際にinputタグのクラスにis-errorを加えて表示を変更し、コントローラで指定したエラーメッセージ表示されるようにしてあります。
アプリケーションの実行
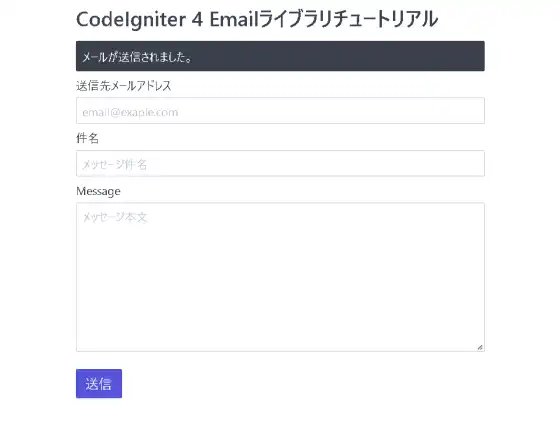
動作を確認しておきましょう。XAMPPでApacheを起動しブラウザでhttp://localhost/ci4-email-tutorial/public/emailにアクセスします。メールアドレス、件名、Messageを入力して送信ボタンを押します。

メールの送信に成功するとメッセージが表示されます。
Email.phpで設定したGmailからフォームで指定したメールアドレスにメールが届きます。
ヴァリデーションのエラー表示も確認しましょう。送信先メールアドレス、件名、Messageを空白の状態のままで送信ボタンを押すと、コントローラで指定したエラーメッセージが表示され、inputタグのクラスにis-errorが加えられ表示が変わっているのが確認できます。

今回のチュートリアルは以上となります。CodeIgniter4のEmailライブラリの使い方が確認できました。CodeIgniterに興味がある方の参考になれば幸いです。