three.jsを散策する⑩ lil-gui でカラーピッカー
three.jsでlil-guiを使用してカラーピッカーを表示する方法を確認します。ライトの強さとメッシュの透過度も調整できるようにしてみます。
lil-gui を使用してカラーピッカーを表示する
前回に引き続きthree.jsでlil-guiの基本的な使い方を確認していきます。lil-guiを使用すると指定したプロパティを調整できるコントロールパネルを表示してくれます。今回はライトとメッシュの色を調整できるようにカラーピッカーの表示方法を確認します。公式サイトを確認したい方は下記のリンクからどうぞ。
執筆時のバージョンはlil-gui 0.18.2です。前回と同じですが、ルートフォルダにindex.htmlを下記のように作成します。
<!DOCTYPE html>
<html>
  <head>
    <meta charset="UTF-8">
    <meta http-equiv="X-UA-Compatible" content="ie=edge">
    <meta name="viewport" content="width=device-width, initial-scale=1.0">
    <title>three.js app</title>
    <script async src="https://unpkg.com/es-module-shims@1.8.0/dist/es-module-shims.js"></script>
    <script type="importmap">
     {
       "imports": {
	 "three": "https://unpkg.com/three@v0.157.0/build/three.module.js",
	 "three/addons/": "https://unpkg.com/three@v0.157.0/examples/jsm/"
       }
     }
    </script>
  </head>
  <body>

    <div id="canvas-container"></div>

    <script type="module" src="main.js"></script>
  </body>
</html>
アドオンを読み込んでおく必要があります。index.htmlはこれで完成です。次にルートフォルダ内にmain.jsを作成します。importでlil-guiを読み込みます。今回はライトの色と強さ、メッシュの色と透過度を調整できるようにしています。
import * as THREE from 'three';
import { OrbitControls } from 'three/addons/controls/OrbitControls.js';
import { GUI } from 'three/addons/libs/lil-gui.module.min.js';

const container = document.querySelector( '#canvas-container' );
let width = container.clientWidth;
let height = 500;

//レンダラー
const renderer = new THREE.WebGLRenderer({ antialias: true });
renderer.setSize( width, height );
renderer.shadowMap.enabled = true;
renderer.shadowMap.type = THREE.VSMShadowMap;
renderer.setClearColor( 0xffffff );
container.appendChild( renderer.domElement );

//シーン
const scene = new THREE.Scene();

//カメラ
const camera = new THREE.PerspectiveCamera( 45, width / height, 0.1, 1000 );
camera.position.set( 15, 16, 13 );

//オービットコントロール
const orbitControls = new OrbitControls( camera, renderer.domElement );
orbitControls.update();

//リサイズの処理
function resize() {
    let width = container.clientWidth;
    renderer.setSize( width, height );
    camera.aspect = width / height;
    camera.updateProjectionMatrix();
};
window.addEventListener( "resize", resize );

//メッシュ
const cubeGeometry = new THREE.BoxGeometry( 6, 4, 6 );
const cubeMaterial = new THREE.MeshLambertMaterial({ color: 0xff0000 });
const cube = new THREE.Mesh( cubeGeometry, cubeMaterial );
cube.castShadow = true;
cube.material.transparent = true;
scene.add( cube );

const planeGeometry = new THREE.PlaneGeometry( 20, 20 );
const planeMaterial = new THREE.MeshLambertMaterial({ color: 0xcccccc });
const plane = new THREE.Mesh( planeGeometry, planeMaterial );
plane.receiveShadow = true;
plane.position.set( 0, -2, 0 );
plane.rotation.set( Math.PI / -2, 0, 0 );
scene.add( plane );

//ライト
const spotLight = new THREE.SpotLight( 0xffffff, 2000 );
spotLight.position.set( 10, 20, 20 );
spotLight.castShadow = true;
scene.add( spotLight );

//lil-GUI
const gui = new GUI( { container: container, width: 320 } );

class ColorGUIHelper {
    constructor( object, prop ) {
	this.object = object;
	this.prop = prop;
    }
    get value() {
	return `#${this.object[ this.prop ].getHexString()}`;
    }
    set value( hexString ) {
	this.object[ this.prop ].set( hexString );
    }
}

const lightFolder = gui.addFolder( 'Light' );
const cubeFolder = gui.addFolder( 'Cube' );
lightFolder.addColor( new ColorGUIHelper( spotLight, 'color' ), 'value' ).name( 'color' );
lightFolder.add( spotLight, 'intensity', 0, 4000, 1 );

cubeFolder.addColor( new ColorGUIHelper( cube.material, 'color' ), 'value' ).name( 'color' );
cubeFolder.add( cube.material, 'opacity', 0, 1, 0.01 );
gui.open( gui._closed );

//レンダリング
function render() {
    requestAnimationFrame( render );
    orbitControls.update();
    renderer.render( scene, camera );
}

render();
まずカラーピッカーに関してですが、lil-GUIの部分でまずColorGUIHelperクラスを定義します。
class ColorGUIHelper {
    constructor( object, prop ) {
	this.object = object;
	this.prop = prop;
    }
    get value() {
	return `#${this.object[ this.prop ].getHexString()}`;
    }
    set value( hexString ) {
	this.object[ this.prop ].set( hexString );
    }
}
このクラスを使用して調整するプロパティを指定して、コントロールパネルに表示する名前を決定します。spotLightとcubeのそれぞれのcolorプロパティを指定しています。
new ColorGUIHelper( spotLight, 'color' ), 'value' ).name( 'color' )
new ColorGUIHelper( cube.material, 'color' ), 'value' ).name( 'color' )
次に透過度の調整に関してですが、メッシュの部分でtransparentプロパティをtrueにしておかないとopacityを調整しても透過度が反映されないのでtrueにしておきます。
cube.material.transparent = true;
最後にコントロールパネルの表示の調整に関してですが、lightとcubeでそれぞれ一括りに表示したいのでフォルダ分けしています。
const lightFolder = gui.addFolder( 'Light' );
const cubeFolder = gui.addFolder( 'Cube' );

lightFolder.addColor( new ColorGUIHelper( spotLight, 'color' ), 'value' ).name( 'color' );
lightFolder.add( spotLight, 'intensity', 0, 4000, 1 );

cubeFolder.addColor( new ColorGUIHelper( cube.material, 'color' ), 'value' ).name( 'color' );
cubeFolder.add( cube.material, 'opacity', 0, 1, 0.01 );
またコントロールパネルをトグルできるようにしています。
gui.open( gui._closed )
描画してみます。
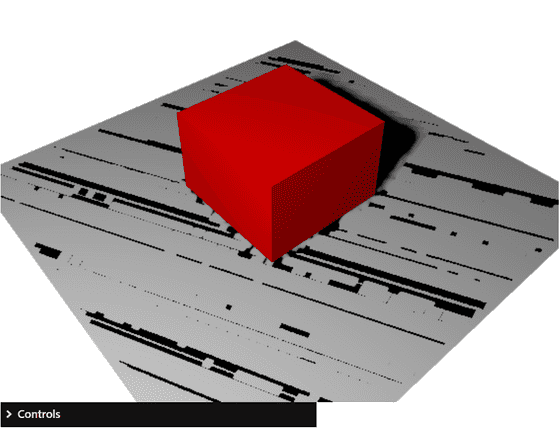
コントロールパネルが閉じた状態で表示されているのでクリックすれば調整できるプロパティが表示されます。
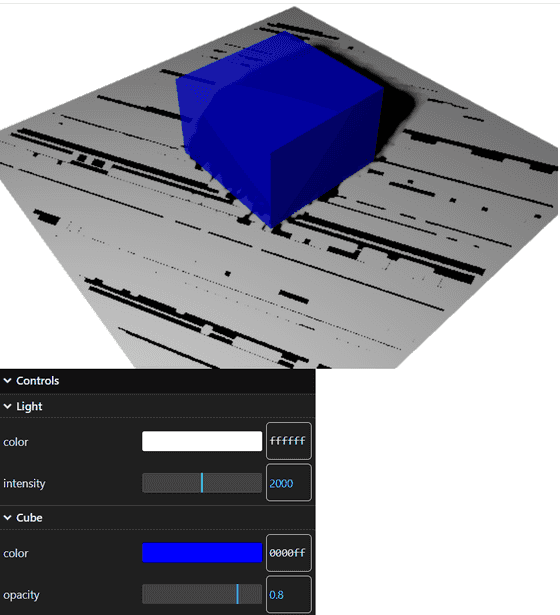
今回は以上です。カラーピッカーの使い方が確認できました。