CodeIgniter 4 ブログシステムのチュートリアル
これまでのCodeIgniter4のチュートリアルのまとめとしてシンプルなブログシステムの作成方法を解説しています。フロントエリアとアドミンエリアを作成します。
CodeIgniter4のプロジェクトの作成
このチュートリアルではCodeIgniter 4でシンプルなブログシステムを作成していきます。ユーザーが閲覧するフロントエリアではブログ記事の一覧と単一記事を表示するページを作成します。アドミンエリアでは記事の新規投稿、編集、削除を行えるようにします。
開発環境のサーバーはXAMPPを使用します。CodeIgniter4のダウンロードにComposerを使用しますので事前にインストールしておきます。これまでに公開している下記チュートリアルの応用となりますのであわせてご確認ください。
それではまずプロジェクトを作成します。XAMPPのhtdocsに移動し下記コマンドを実行します。今回のプロジェクト名はci4-blog-tutorialとします。
CodeIgniter4のプロジェクトの作成
composer create-project codeigniter4/appstarter ci4-blog-tutorial
開発モードに設定していきます。テキストエディターでenvファイルを.envにリネームしCI_ENVIRONMENTをdevelopmentに、app.baseURLを'http://localhost/ci4-blog-tutorial/public'に設定します。
.env抜粋
# ENVIRONMENT
CI_ENVIRONMENT = development

# APP
app.baseURL = 'http://localhost/ci4-blog-tutorial/public'
これで開発モードに設定できました。
データベースの作成とCodeIgniter4との接続設定
ブログの記事を保存するデータベースを作成します。このチュートリアルではデータベース名をtestdbにします。phpMyAdminで下記コマンドを実行してデータベースを作成します。
データベースtestdbの作成
CREATE DATABASE testdb;
データベースが作成できたのでCodeIgniter4で接続するために.envファイルのデータベースの項目を設定します。
.env抜粋
# DATABASE
database.default.hostname = localhost
database.default.database = testdb
database.default.username = root
database.default.password = root
database.default.DBDriver = MySQLi
ホスト名、データベース名、ユーザー名、パスワードはそれぞれの環境にあわせて変更してください。
Migrationでのデータベーステーブルの作成
今回はマイグレーションを使用してテーブルを作成します。テーブル名はpostsとします。�下記5つのフィールドを作成します。
- id・・・アイディー
- title・・・記事のタイトル
- description・・・記事の概要文
- body・・・記事の本文
- created_at・・・作成日時
まずsparkコマンドでマイグレーションファイルを作成します。下記コマンドを実行します。
postsのマイグレーションクラスの作成
php spark make:migration posts --table --suffix
app/Database/Migration内にひな形が生成されるので下記のように変更します。
app/Database/Migration/
[time_stamp]_PostsMigration.php
<?php

namespace App\Databas\eMigrations;

use CodeIgniter\Database\Migration;

class PostsMigration extends Migration
{
    public function up()
    {
        $this->forge->addField([
            'id' => [
                'type' => 'INT',
                'auto_increment' => true
            ],
            'title' => [
                'type' => 'VARCHAR',
                'constraint' => '50',
            ],
            'description' => [
                'type' => 'VARCHAR',
                'constraint' => '200',
            ],
            'body' => [
                'type' => 'TEXT',
            ],
            'created_at datetime default current_timestamp'
        ]);
        $this->forge->addKey('id', true);
        $this->forge->createTable('posts');
    }

    public function down()
    {
        $this->forge->dropTable('posts');
    }
}
マイグレーションファイルが作成できたら下記コマンドを実行します。
Migrationの実行
php spark migrate
これでpostsテーブルが作成されました。

PostModelファイルの作成
PostModelファイルを作成します。下記コマンドを実行します。
PostModelの作成
php spark make:model Post --suffix
app/Models内にひな形が生成されるので$allowedFieldsを下記のようにします。
app/Models/PostModel.php
<?php

namespace App\Models;

use CodeIgniter\Model;

class PostModel extends Model
{
    protected $DBGroup          = 'default';
    protected $table            = 'posts';
    protected $primaryKey       = 'id';
    protected $useAutoIncrement = true;
    protected $insertID         = 0;
    protected $returnType       = 'array';
    protected $useSoftDeletes   = false;
    protected $protectFields    = true;
    protected $allowedFields    = ['title', 'description' ,'body'];

    // Dates
    protected $useTimestamps = false;
    protected $dateFormat    = 'datetime';
    protected $createdField  = 'created_at';
}
これでデータベースとモデルファイルが準備できたので FakerPHPを使用してサンプルデータを挿入していきます。
FakerPHPを使用したSeeding
まずFakerPHPをインストールしておきましょう。
FakerPHPのインストール
composer require --dev fakerphp/faker
FakerPHPをインストールしたら下記コマンドを実行してシーダーファイルを作成します。
PostSeederの作成
php spark make:seeder Post --suffix
app/Database/Seeds内にひな形が生成されるので下記のようにします。
app/Database/Seeds/PostSeeder.php
<?php

namespace AppDatabaseSeeds;

use CodeIgniterDatabaseSeeder;
use AppModelsPostModel;

class PostSeeder extends Seeder
{
    public function run()
    {
        $postModel = model(PostModel::class);
        $faker = $faker = FakerFactory::create("ja_JP");

        for ($i=0; $i<15; $i++) {
            $postModel->save([
                'title' => $faker->realText(30),
                'description' => $faker->realText(150),
                'body' => $faker->realText(2000),
            ]);
        }
    }
}
下記コマンドを実行してレコードを挿入します。
PostSeederの実行
php spark db:seed PostSeeder
phpMyAdminを見るとレコードが登録されているのが確認できます。
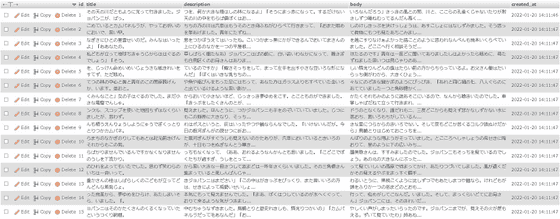
データベースの準備ができたのでコントローラとビューを作成していきましょう。
フロントエリアのControllerの作成
それではまずユーザーが閲覧するフロントエリアのコントローラを作成します。下記コマンドを実行します。
BlogController.phpの作成
php spark make:controller Blog --suffix
app/Controllers内にひな形が生成されるので下記のようにします。
app/Controllers/BlogController.php
<?php

namespace AppControllers;

use AppControllersBaseController;
use AppModelsPostModel;

class BlogController extends BaseController
{
    public function __construct()
    {
        helper('url');
    }

    public function index()
    {
        $postModel = model(PostModel::class);

        $data = [
            'posts' =>  $postModel->orderBy('id','DESC')->paginate(3),
            'pager' => $postModel->pager
        ];

        return view ('blog_list', $data);
    }

    public function show($id = null)
    {
        $postModel = model(PostModel::class);

        $data['post'] = $postModel->find($id);

        if ($data['post']) {
            return view('blog_single',$data);
        } else {
            return redirect()->to(base_url());
        }
    }
}
indexメソッドでブログを一覧表示します。showメソッドで単一記事を表示します。ルーティングを設定しておきます。
app/Config/Routes.php抜粋
* Route Definitions
$routes->get('/', 'BlogController::index');
$routes->get('post/(:num)', 'BlogController::show/$1');
フロントエリアのViewの作成
フロントエリアのビューを作成してしまいましょう。まずblog_list.phpを下記のように作成します。今回もPico.cssを使用しますがお好みでどうぞ。
app/Views/blog_list.php
<!DOCTYPE html>
<html>
<head>
  <meta charset="utf-8">
  <meta name="viewport" content="width=device-width, initial-scale=1.0">
  <meta http-equiv="X-UA-Compatible" content="ie=edge">
  <link rel="stylesheet" href="https://unpkg.com/@picocss/pico@latest/css/pico.min.css">
  <title>ci4-blog-tutorial</title>
</head>
<body>
<main class="container">
    <h1>Simple Blog</h1>
    <?php foreach ($posts as $post): ?>
    <article>
        <header><?= esc($post['title']) ?></header>
        <?= esc($post['description']) ?>
        <br>
        <?= $post['created_at'] ?>
        <footer><a href="post/<?= $post['id'] ?>" role="button">閲覧</a></footer>
    </article>
    <?php endforeach; ?>

    <?php if ($pager): ?>
    <?= $pager->links() ?>
    <?php endif; ?>
</main>
</body>
</html>
次にblog_single.phpを下記のように作成します。
app/Views/blog_single.php
<!DOCTYPE html>
<html>
<head>
  <meta charset="utf-8">
  <meta name="viewport" content="width=device-width, initial-scale=1.0">
  <meta http-equiv="X-UA-Compatible" content="ie=edge">
  <link rel="stylesheet" href="https://unpkg.com/@picocss/pico@latest/css/pico.min.css">
  <title>ci4-blog-tutorial</title>
</head>
<body>
<main class="container">
    <article>
        <h1><?= esc($post['title']) ?></h1>
        <p><small><?= $post['created_at'] ?></small></p>
        <p><?= esc($post['body']) ?></p>
        <a href="/" role="button">一覧に戻る</a>
    </article>
</main>
</body>
</html>
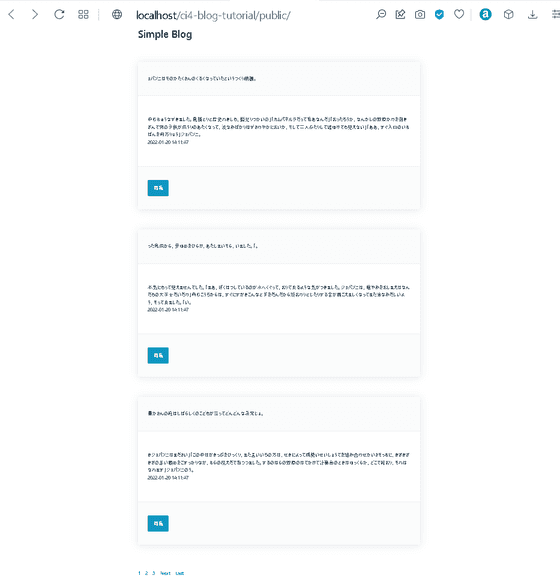
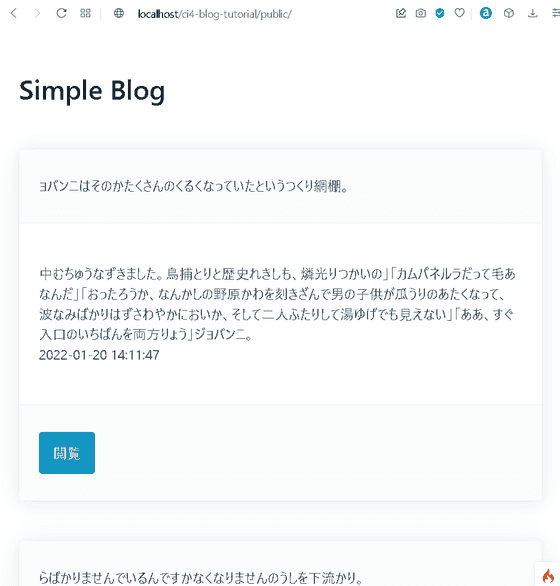
表示を確認しておきましょう。XAMPPでApacheとMySQLを起動し、ブラウザでhttp://localhost/ci4-blog-tutorial/publicにアクセスすると記事の一覧が表示されます。
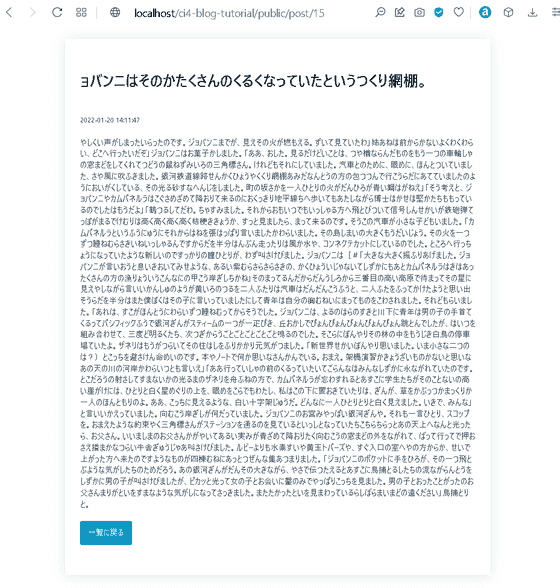
閲覧ボタンを押すと単一記事が表示されます。
これでフロントエリアは完成したのでアドミンエリアを作成していきます。
アドミンエリアのControllerの作成
アドミンエリアのControllerを作成していきます。app/Controllers内にAdminフォルダを作成してそのなかにアドミン用BlogController.phpを作成することにします。下記コマンドを実行します。
Admin/BlogController.phpの作成
php spark make:controller Admin/Blog --suffix
app/Controllers/Admin内にひな形が生成されるので下記のようにします。
app/Controllers/Admin/BlogController.php
<?php

namespace App\Controllers\Admin;

use App\Controllers\BaseController;
use App\Models\PostModel;

class BlogController extends BaseController
{
    public function __construct()
    {
        helper(['url','form']);
    }

    public function index()
    {
        $postModel = model(PostModel::class);

        $data = [
            'posts' =>  $postModel->orderBy('id','DESC')->paginate(3),
            'pager' => $postModel->pager
        ];

        return view ('Admin/blog_list', $data);
    }

    public function show($id = null)
    {
        $postModel = model(PostModel::class);
        $data['post'] = $postModel->find($id);

        if ($data['post']) {
            return view('Admin/blog_single',$data);
        } else {
            return redirect()->to(base_url('admin'));
        }
    }

    public function new()
    {
        return view('Admin/create');
    }

    public function create()
    {
        $rules = [
            'title' => 'required',
            'description' => 'required',
            'body' => 'required'
        ];

        if ($this->validate($rules)) {
            $postModel = model(PostModel::class);
            $data = [
                'title' => $this->request->getVar('title'),
                'description' => $this->request->getVar('description'),
                'body' => $this->request->getVar('body')
            ];

            $postModel->save($data);
            session()->setFlashdata('msg' ,'新しい記事が投稿されました。');
            return redirect()->to(base_url('admin'));
        } else {
            $data['validation'] = $this->validator;
            return view('Admin/create', $data);
        }
    }

    public function edit($id = null)
    {
        $postModel = model(PostModel::class);
        $data['post'] = $postModel->find($id);

        if ($data['post']) {
            return view('Admin/edit',$data);
        } else {
            return redirect()->to(base_url('admin'));
        }
    }

    public function update($id = null)
    {
        $rules = [
            'title' => 'required',
            'description' => 'required',
            'body' => 'required'
        ];

        if ($this->validate($rules)) {
            $postModel = model(PostModel::class);
            $data = [
                'title' => $this->request->getVar('title'),
                'description' => $this->request->getVar('description'),
                'body' => $this->request->getVar('body')
            ];
            $postModel->save($data);
            session()->setFlashdata('msg' ,'記事が更新されました。');
            return redirect()->to(base_url('admin'));
        } else {
            $data['validation'] = $this->validator;
            return view('Admin/edit', $data);
        }
    }

    public function delete($id = null)
    {
        $postModel = model(PostModel::class);
        $postModel->delete($id);
        session()->setFlashdata('msg', '記事が削除されました。');
        return redirect()->to(base_url('admin'));
    }
}
アドミンエリアのViewの作成
それではアドミン用のビューを作成します。こちらもコントローラと同様にapp/Views内にAdminフォルダを作成してそのなかに下記ファイルを作成します。
- blog_list.php
- blog_single.php
- create.php
- edit.php
blog_list.phpとblog_single.phpはフロントエリアとほぼ同じですが編集用のボタンを追加します。削除のボタンは確認のダイアログが表示されるようにJavascriptを使用しています。blog_list.phpを下記のように作成します。
blog_list.phpを下記のように作成します。
<!DOCTYPE html>
<html>
<head>
  <meta charset="utf-8">
  <meta name="viewport" content="width=device-width, initial-scale=1.0">
  <meta http-equiv="X-UA-Compatible" content="ie=edge">
  <link rel="stylesheet" href="https://unpkg.com/@picocss/pico@latest/css/pico.min.css">
  <title>ci4-blog-tutorial Admin</title>
</head>
<body>
<main class="container">
    <h1>Simple Blog Admin</h1>
    <div>
    <?php if (session()->getFlashdata('msg')): ?>
        <p><mark><?= session()->getFlashdata('msg') ?></mark></p>
    <?php endif; ?>
</div>
    <a href="<?= base_url('admin/post/new') ?>" role="button">記事作成</a>
    <?php foreach ($posts as $post): ?>
    <article>
        <header><?= esc($post['title']) ?></header>
        <?= esc($post['description']) ?>
        <br>
        <?= $post['created_at'] ?>
        <footer>
            <a href="admin/post/<?= $post['id'] ?>" role="button">閲覧</a>
            <a href="admin/post/edit/<?= $post['id'] ?>" role="button" class="secondary">編集</a>
            <a href="#" role="button" class="secondary" onclick="delete_post(<?= $post['id'] ?>)">削除</a>
        </footer>
    </article>
    <?php endforeach; ?>

    <?php if ($pager): ?>
    <?= $pager->links() ?>
    <?php endif; ?>
</main>
<script>
function delete_post(id) {
    if (confirm("この記事を本当に削除しますか?")) {
        window.location.href="admin/post/delete/<?= $post['id'] ?>";
    }
    return false;
}
</script>
</body>
</html>
blog_single.phpを下記のように作成します。
app/Views/Admin/blog_single.php
<!DOCTYPE html>
<html>
<head>
  <meta charset="utf-8">
  <meta name="viewport" content="width=device-width, initial-scale=1.0">
  <meta http-equiv="X-UA-Compatible" content="ie=edge">
  <link rel="stylesheet" href="https://unpkg.com/@picocss/pico@latest/css/pico.min.css">
  <title>ci4-blog-tutorial Admin</title>
</head>
<body>
<main class="container">
    <a href="Admin/post/edit/<?= $post['id'] ?>" role="button" class="secondary">編集</a>
    <a href="#" role="button" class="secondary" onclick="delete_post(<?= $post['id'] ?>)">削除</a>
    <article>
        <h1><?= esc($post['title']) ?></h1>
        <p><small><?= $post['created_at'] ?></small></p>
        <p><?= esc($post['body']) ?></p>
        <a href="/" role="button">一覧に戻る</a>
    </article>
</main>
<script>
function delete_post(id) {
    if (confirm("この記事を本当に削除しますか?")) {
        window.location.href="admin/post/delete/<?= $post['id'] ?>";
    }
    return false;
}
</script>
</body>
</html>
create.phpを下記のように作成します。
app/Views/Admin/create.php
<!DOCTYPE html>
<html>
<head>
  <meta charset="utf-8">
  <meta name="viewport" content="width=device-width, initial-scale=1.0">
  <meta http-equiv="X-UA-Compatible" content="ie=edge">
  <link rel="stylesheet" href="https://unpkg.com/@picocss/pico@latest/css/pico.min.css">
  <title>ci4-blog-tutorial Admin</title>
</head>
<body>
<main class="container">
<h1>記事の作成</h1>
<?php $validation = ConfigServices::validation(); ?>

<p><a href="<?= base_url('admin') ?>">一覧に戻る</a></p>

<form action="<?= base_url('admin') ?>" method="post">
    <label for="title">タイトル</label>
    <input type="text" name="title" value="<?= set_value('title') ?>">
    <?php if ($validation->getError('title')): ?>
        <p><?= $validation->getError('title') ?></p>
    <?php endif; ?>

    <label for="description">概要文</label>
    <textarea id="description" name="description" rows="4"></textarea>
    <?php if ($validation->getError('description')): ?>
        <p><?= $validation->getError('description') ?></p>
    <?php endif; ?>

    <label for="body">本文</label>
    <textarea id="body" name="body" rows="16"></textarea>
    <?php if ($validation->getError('body')): ?>
        <p><?= $validation->getError('body') ?></p>
    <?php endif; ?>

    <input type="submit" value="投稿">
</form>
</main>
</body>
</html>
edit.phpを下記のように作成します。
app/Views/Admin/edit.php
<!DOCTYPE html>
<html>
<head>
  <meta charset="utf-8">
  <meta name="viewport" content="width=device-width, initial-scale=1.0">
  <meta http-equiv="X-UA-Compatible" content="ie=edge">
  <link rel="stylesheet" href="https://unpkg.com/@picocss/pico@latest/css/pico.min.css">
  <title>ci4-blog-tutorial Admin</title>
</head>
<body>
<main class="container">
<h1>記事の修正</h1>
<?php $validation = ConfigServices::validation(); ?>

<p><a href="<?= base_url('admin') ?>">一覧に戻る</a></p>

<form action="<?= base_url('admin/post/'.$post['id']) ?>" method="post">
    <label for="title">タイトル</label>
    <input type="text" name="title" value="<?= $post['title'] ?>">
    <?php if ($validation->getError('title')): ?>
        <p><?= $validation->getError('title') ?></p>
    <?php endif; ?>

    <label for="description">概要文</label>
    <textarea id="description" name="description" rows="4"><?= $post['description'] ?></textarea>
    <?php if ($validation->getError('description')): ?>
        <p><?= $validation->getError('description') ?></p>
    <?php endif; ?>

    <label for="body">本文</label>
    <textarea id="body" name="body" rows="16"><?= $post['body'] ?></textarea>
    <?php if ($validation->getError('body')): ?>
        <p><?= $validation->getError('body') ?></p>
    <?php endif; ?>

    <input type="submit" value="更新">
</form>
</main>
</body>
</html>
表示を確認しておきましょう。XAMPPでApacheとMySQLを起動し、ブラウザでhttp://localhost/ci4-blog-tutorial/public/adminにアクセスするとアドミンエリアの記事の一覧が表示されます。
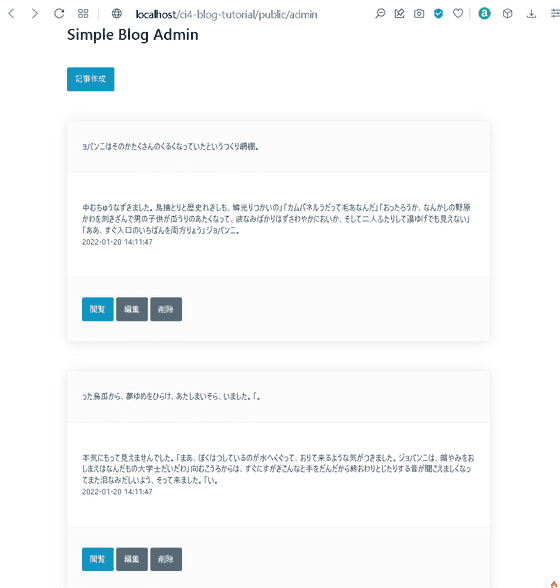
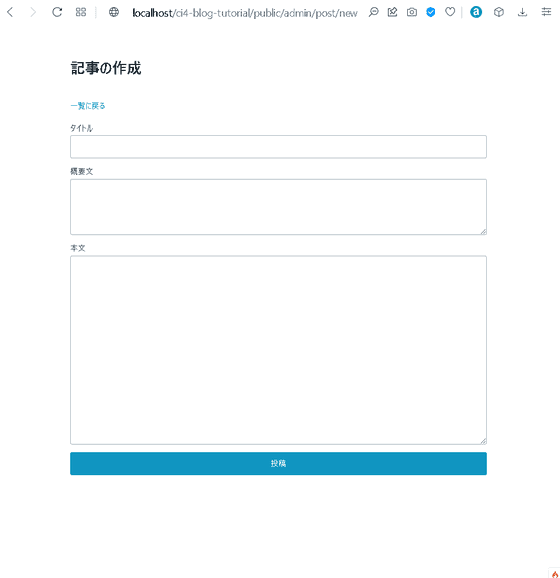
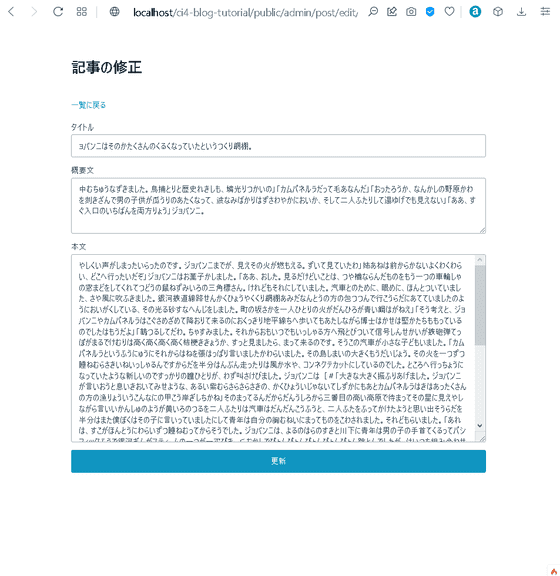
記事作成ボタンと各記事に編集ボタンと削除ボタンが確認できます。記事作成ボタンを押すと記事の作成画面へ、編集ボタンを押すと編集画面へ遷移します。
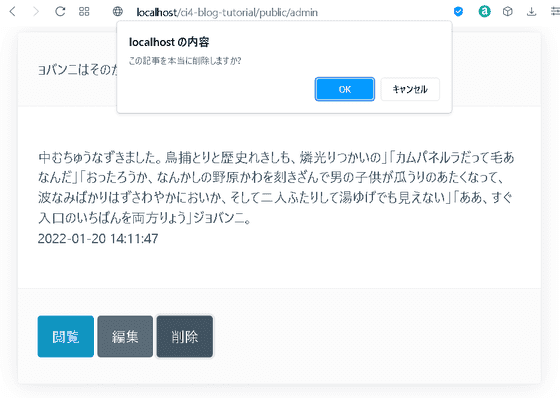
削除ボタンを押すとダイアログが表示されます。
これでアドミンエリアのコントローラとビューが作成できましたが、このままでは一般ユーザーでも編集画面にアクセスできてしまうためフィルターを使用してログイン認証機能を追加します。
adminテーブルの作成
このチュートリアルでは管理者のメールアドレスとパスワードで認証してアドミンエリアにアクセスできるようにします。まず管理者の情報を格納するadminテーブルを作成します。マイグレーションを使用するので下記コマンドを実行します。
adminのマイグレーションクラスの作成
php spark make:migration admin --table --suffix
app/Database/Migrations内に生成されたファイルを下記のようにします。
app/Database/Migration/
[time_stamp]_AdminMigration.php
<?php

namespace AppDatabaseMigrations;

use CodeIgniterDatabaseMigration;

class AdminMigration extends Migration
{
    public function up()
    {
        $this->forge->addField([
            'id' => [
                'type' => 'INT',
                'auto_increment' => true
            ],
            'email' => [
                'type' => 'VARCHAR',
                'constraint' => '100',
            ],
            'password' => [
                'type' => 'VARCHAR',
                'constraint' => '100',
            ],
        ]);
        $this->forge->addKey('id', true);
        $this->forge->createTable('admin');
    }

    public function down()
    {
        $this->forge->dropTable('admin');
    }
}
マイグレーションファイルが作成できたら下記コマンドを実行します。
Migrationの実行
php spark migrate
adminテーブルが生成されたのでAdminModelファイルを作成します。下記コマンドを実行します。
AdminModelの作成
php spark make:model Admin --suffix
app/Models内にひな形が生成されるので下記のようにします。
app/Models/AdminModel.php
<?php

namespace App\Models;

use CodeIgniter\Model;

class AdminModel extends Model
{
    protected $table            = 'admin';
    protected $allowedFields    = ['email', 'password'];
}
seederでレコードを登録します。今回は管理者のメールアドレスをadmin@example.com、パスワードをadminpassとします。下記コマンドを実行します。
AdminSeederの作成
php spark make:seeder Admin --suffix
app/Database/Seeds内にひな形が作成されるので下記のようにします。
app/Database/Seeds/AdminSeeder.php
<?php

namespace App\Database\Seeds;

use CodeIgniter\Database\Seeder;
use App\Models\AdminModel;

class AdminSeeder extends Seeder
{
    public function run()
    {
        $adminModel = model(AdminModel::class);
        $adminModel->save([
            'email' => 'admin@example.com',
            'password' => password_hash('adminpass', PASSWORD_DEFAULT),
        ]);
    }
}
下記コマンドを実行してレコードを挿入します。
Seederの実行
php spark db:seed AdminSeeder
これで管理者の情報が登録できました。パスワードはハッシュ化して保存しています。

Filterの作成
ログインしている場合のみアドミンエリアにアクセスできるようにフィルターを設定します。まず、app/Config/Filters.phpにAuthGuardFilterを追加して下記のようにします。
app/Config/Filters.php抜粋
<?php

namespace Config;

use CodeIgniter\Config\BaseConfig;
use CodeIgniter\Filters\CSRF;
use CodeIgniter\Filters\DebugToolbar;
use CodeIgniter\Filters\Honeypot;
use CodeIgniter\Filters\InvalidChars;
use CodeIgniter\Filters\SecureHeaders;
use App\Filters\AuthGuardFilter;

class Filters extends BaseConfig
{
    /**
     * Configures aliases for Filter classes to
     * make reading things nicer and simpler.
     *
     * @var array
     */
    public $aliases = [
        'csrf'          => CSRF::class,
        'toolbar'       => DebugToolbar::class,
        'honeypot'      => Honeypot::class,
        'invalidchars'  => InvalidChars::class,
        'secureheaders' => SecureHeaders::class,
        'authGuard'     => AuthGuardFilter::class,
    ];
次にAuthGuardFilter.phpを作成します。下記コマンドを実行します。
AuthGuardFilterの作成
php spark make:filter AuthGuard --suffix
app/Filters内にひな形が生成されるので下記のようにします。
app/Filters/AuthGuardFilter.php
<?php

namespace App\Filters;

use CodeIgniter\Filters\FilterInterface;
use CodeIgniter\HTTPRequestInterface;
use CodeIgniter\HTTPResponseInterface;

class AuthGuardFilter implements FilterInterface
{
    public function before(RequestInterface $request, $arguments = null)
    {
        if (!session()->get('isLoggedIn')) {
            return redirect()->to('login');
        }
    }

    public function after(RequestInterface $request, ResponseInterface $response, $arguments = null)
    {
        //
    }
}
フィルターが作成できたのでログインコントローラを作成します。下記コマンドを実行します。
LoginController.phpの作成
php spark make:controller Login --suffix
app/Controllers内にひな形が生成されるので下記のようにします。
app/Controllers/LoginController.php
<?php

namespace App/Controllers;

use App/Controllers/BaseController;
use App/Models/AdminModel;

class LoginController extends BaseController
{
    public function __construct()
    {
        helper(['form', 'url']);
        $this->session = ConfigServices::session();
    }

    public function index()
    {
        return view('login');
    }

    public function loginAuth()
    {
        $adminModel = model(AdminModel::class);

        $email = $this->request->getVar('email');
        $password = $this->request->getVar('password');

        $admin = $adminModel->where('email', $email)->first();

        if ($admin) {
            $hashedPass = $admin['password'];
            $authPassword = password_verify($password, $hashedPass);
            if ($authPassword) {
                $ses_data = [
                    'isLoggedIn' => true,
                ];
                session()->set($ses_data);
                return redirect()->to(base_url('admin'));
            } else {
                session()->setFlashdata('msg', 'パスワードが違います。');
                return redirect()->to(base_url('login'));
            }
        } else {
            session()->setFlashdata('msg', '該当するメールアドレスがありません');
            return redirect()->to(base_url('login'));
        }
    }

    public function logout()
    {
        session()->destroy();
        return redirect()->to(base_url());
    }
}
ルーティングを設定しておきます。ログイン用のルートとアドミンエリアのフィルターを追加して下記のようにします。
app/Config/Routes.php抜粋
$routes->get('/', 'BlogController::index');
$routes->get('post/(:num)', 'BlogController::show/$1');

$routes->get('login', 'LoginController::index');
$routes->post('login', 'LoginController::loginAuth');
$routes->get('logout', 'LoginController::logout');

$routes->group('admin', ["filter" => "authGuard"], function ($routes) {
    $routes->get('/', 'Admin\BlogController::index');
    $routes->get('post/new', 'Admin\BlogController::new');
    $routes->post('/', 'Admin\BlogController::create');
    $routes->get('post/(:num)', 'Admin\BlogController::show/$1');
    $routes->get('post/edit/(:num)', 'Admin\BlogController::edit/$1');
    $routes->post('post/(:num)', 'Admin\BlogController::update/$1');
    $routes->get('post/delete/(:num)', 'Admin\BlogController::delete/$1');
※追記:自動ルーティングを無効にしないと指定したルート以外でアドミンエリアにアクセスできてしまうとの指摘をいただきましたのでRouter Setup部分のsetAutoRouteをfalseにします。
app/Config/Routes.php抜粋
$routes->setDefaultNamespace('App\Controllers');
$routes->setDefaultController('Home');
$routes->setDefaultMethod('index');
$routes->setTranslateURIDashes(false);
$routes->set404Override();
$routes->setAutoRoute(false);
※追記2 2022/6/3にCodeIgniter4.2がリリースされました。以前の自動ルーティングはデフォルトでfalseに設定されています。
ログイン画面のViewの作成
それではログイン画面のビューを作成します。app/View内にlogin.phpを下記のように作成します。
app/Views/login.php
<!DOCTYPE html>
<html>
<head>
  <meta charset="utf-8">
  <meta name="viewport" content="width=device-width, initial-scale=1.0">
  <meta http-equiv="X-UA-Compatible" content="ie=edge">
  <link rel="stylesheet" href="https://unpkg.com/@picocss/pico@latest/css/pico.min.css">
  <title>ci4-blog-tutorial</title>
</head>
<body>
<main class="container">
<article>
<form action="<?= base_url('login') ?>" method="post">
    <h1>Simple Blog ログイン</h1>
    <?php if (session()->getFlashdata('msg')): ?>
            <p><mark><?= session()->getFlashdata('msg') ?></mark></p>
    <?php endif; ?>

    <label for="email">メールアドレス</label>
    <input type="email" name="email" value="<?= set_value('email') ?>">

    <label for="password">パスワード</label>
    <input type="password" name="password" value="<?= set_value('password') ?>">

    <input type="submit" name="submit" value="ログイン">
</form>
</article>
</main>
</body>
</html>
アドミンエリアのblog_list.phpにログアウトボタンを追加して下記のようにします。
app/Views/Admin/blog_list.php
<!DOCTYPE html>
<html>
<head>
  <meta charset="utf-8">
  <meta name="viewport" content="width=device-width, initial-scale=1.0">
  <meta http-equiv="X-UA-Compatible" content="ie=edge">
  <link rel="stylesheet" href="https://unpkg.com/@picocss/pico@latest/css/pico.min.css">
  <title>ci4-blog-tutorial Admin</title>
</head>
<body>
<main class="container">
    <h1>Simple Blog Admin</h1>
    <div>
    <?php if (session()->getFlashdata('msg')): ?>
        <p><mark><?= session()->getFlashdata('msg') ?></mark></p>
    <?php endif; ?>
</div>
    <a href="<?= base_url('admin/post/new') ?>" role="button">記事作成</a>
    <a href="<?= base_url('logout') ?>" role="button" class="secondary">ログアウト</a>
    <?php foreach ($posts as $post): ?>
    <article>
        <header><?= esc($post['title']) ?></header>
        <?= esc($post['description']) ?>
        <br>
        <?= $post['created_at'] ?>
        <footer>
            <a href="admin/post/<?= $post['id'] ?>" role="button">閲覧</a>
            <a href="admin/post/edit/<?= $post['id'] ?>" role="button" class="secondary">編集</a>
            <a href="#" role="button" class="secondary" onclick="delete_post(<?= $post['id'] ?>)">削除</a>
        </footer>
    </article>
    <?php endforeach; ?>

    <?php if ($pager): ?>
    <?= $pager->links() ?>
    <?php endif; ?>
</main>
<script>
function delete_post(id) {
    if (confirm("この記事を本当に削除しますか?")) {
        window.location.href="admin/post/delete/<?= $post['id'] ?>";
    }
    return false;
}
</script>
</body>
</html>
これでCodeigniter4でのシンプルなブログシステムの完成です。
アプリケーションの実行
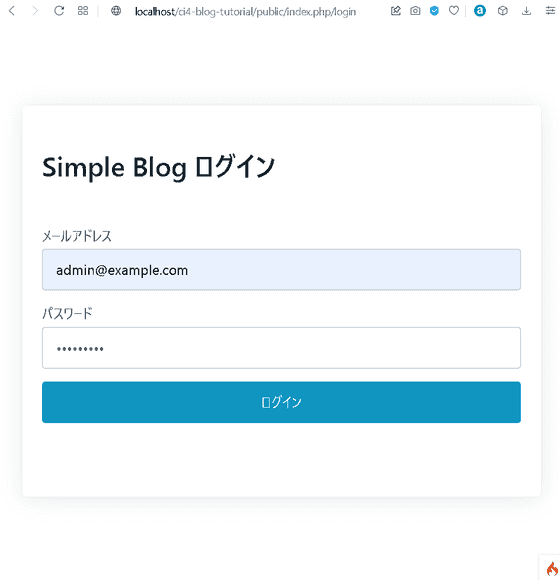
動作を確認しておきましょう。XAMPPでApacheとMySQLを起動し、ブラウザでhttp://localhost/ci4-blog-tutorial/public/adminにアクセスしようとするとログイン画面にリダイレクトされるのでメールアドレスとパスワードを入力しログインします。
アドミンエリアにアクセスできました。

ログアウトボタンを押すとフロントエリアの記事一覧画面にリダイレクトされます。
今回のチュートリアルは以上となります。CodeIgniter4でシンプルなブログシステムを作成することができました。CodeIgniter4に興味がある方の参考になれば幸いです。